<![CDATA[Yoder Bacon]]>2016-05-18T21:53:31-07:00http://trayo.github.io/Octopress<![CDATA[Jump and Delete Words in iTerm]]>2016-05-18T20:51:59-07:00http://trayo.github.io/blog/2016/05/18/jump-and-delete-words-in-itermI really feel like I’m missing out on being able to jump words when working in terminal and found some blogs on how to do it by using option. I tried it for a while and found the option key to be placed in such a weird position on the Apple keyboards that I wouldn’t use option and often forget about it while in the “programming zone”.
I’m already used to using ctrl + f and ctrl + b to move the cursor forward and backward in terminal and, instead of option, decided to give ctrl + shift a try. I found this to be easier to use given the placement of capslock (which should be your ctrl!) and shift on the keyboard, compared to option.
If you use ctrl + b and ctrl + f to navigate cursor, I recommend give these steps a try. If you don’t use those keyboard shortcuts they will take time to get used to, but I like them particularily because I don’t have to lift my hands off of home row to reach the arrow keys.
How To Use Ctrl + Shift + f and Ctrl + Shift + b To Jump Words
To assign the shortcut open the iTerm preferences and choose the keys tab. Select the + button at the bottom to add a new shortcut. In the Keyboard Shortcut field, push the keys ctrl + shift + b or ctrl + shift + f and you should see something like ^⬆︎B or ^⬆︎F. Then, in the Action dropdown, select Send Escape Sequence and enter the same letter (b or f) as the keyboard shortcut you entered.
Do it for the other key and that’s all there is to it!
How To Assign Ctrl + Shift + Delete To Delete Whole Words
Assign a keyboard shortcut, in the same way as above, and use ctrl + shift + delete as the Keyboard Shortcut. Then for the Action select Send Hex Code and use the code 17 in the field.
How To Assign Option
Optionally, if you still want to use option instead of ctrl + shift, you can use option + ⟵ and option + ⟶ when assigning the keyboard shortcut to jump words and option + delete when assigning the keyboard shortcut for deleting words.
]]><![CDATA[Customizing Pry]]>2015-05-23T10:20:31-07:00http://trayo.github.io/blog/2015/05/23/customizing-pryIn this tutorial I’m going to be showing off a couple different ways that I customized the pry gem.
You’ll need to add a .pryrc file to your root directory. You can do it with this command: touch ~/.pryrc.
Block Commands
Pry block commands are a way for you to add shortcuts to every pry session.
The first one I set up was for the built in play method that pry supports. I found myself copying lines of code from a binding.pry breakpoint that I was in and pasting them line by line to see the result of the output. This can be slow and painful when there’s a lot of code in a method.
The play command allows you to play a line of code or lines of code using a range of numbers, using the flag -l. Here is an example:
1234567891011121314151617181920212223242526
=> 1: require "pry"; binding.pry
   2:
   3: p "Hello #{name}"
   4: p "Konichiwa #{name}"
   5: p "Hola #{name}"
   6:

[1] pry (main)> play -l 3
NameError: undefined local variable or method `name' for main:Object
from (pry):1:in `<main>'

[2] pry (main)> name = "travis"
=> "travis"

[3] pry (main)> play -l 3
"Hello travis"
=> "Hello travis"

[4] pry (main)> name = "Solid Snake"
=> "Solid Snake"

[5] pry (main)> play -l 3..5
"Hello Solid Snake"
"Konichiwa Solid Snake"
"Hola Solid Snake"
=> "Hola Solid Snake"
This is where block commands come in to play. I wanted to make it slightly easier to type play -l so I added this to my .pryrc:
123
Pry::Commands.block_command 'pl', "Alias for 'play -l'" do |lines|
  _pry_.run_command("play -l #{lines}")
end
Pry::Commands.block_command 'pl' says to make a command with the name ‘pl’. "Alias for 'play -l'" is a description of the command.
You can have the method take parameters with do |lines|. _pry_.run_command uses the current pry instance to run a pry command.
And then we tell it to run the play -l command with a line or range of lines.
Note: the code within the block is actually plain ruby code
Now in our example we can do:
12345678910111213141516171819
=> 1: require "pry"; binding.pry
   2:
   3: p "Hello #{name}"
   4: p "Konichiwa #{name}"
   5: p "Hola #{name}"
   6:

[1] pry (main)> pl 3
NameError: undefined local variable or method `name' for main:Object
from (pry):1:in `<main>'

[2] pry (main)> name = "Liquid Snake"
=> "Liquid Snake"

[3] pry (main)> pl 3..5
"Hello Liquid Snake"
"Konichiwa Liquid Snake"
"Hola Liquid Snake"
=> "Hola Liquid Snake"
Simple right?
Alias ‘jk’ for ‘exit!’
123
Pry::Commands.block_command 'jk', "Alias for 'exit!'" do
  exit
end
With this command I can type jk to exit in the same way that you can type exit!. Combined with using CTRL + D to step through breakpoints it feels nice and quick to enter a binding, check a variable, jump to a different breakpoint to check it again and exit out.
The Edit Command and Your Default Editor
The edit command is super useful for quickly editing code in a heavy pry session without losing possible variables or methods. Here’s how to setup your default editor, simply replace “vim” with the editor of your choice:
After saving and closing Vim, we return back to pry:
1234567891011121314151617
=> :hello
[3] pry (main)> show-source hello

From: (pry) @ line 4:
Owner: Object
Visibility: public
Number of lines: 4

def hello
  puts "Hello,"
  puts "Mr. Bond"
end

[4] pry (main)> hello
Hello,
Mr. Bond
=> nil
Prompt Name
This command can be used in combination with having a .pryrc in each project folder that you’re working on. This would let you see the project name as your pry prompt like so:
[1] my_project (main)>
Otherwise, if you use the .pryrc in your root directory, it’ll be applied globally. I decided I wanted to make pry look a little more awesome so I stuck an emoji in there. Here’s the command you use:
Pry.config.prompt_name = "🙏 "
Note: I put an extra space on the end so it’s centered.
Now my prompt looks like this:
12345678
[1] 🙏(main)> def pray
[1] 🙏(main)*   puts "let's hope this works"
[1] 🙏(main)* end
=> :pray
[2] 🙏(main)> pray
let's hope this works
=> nil
[3] 🙏(main)>
That’s It
I’m continuing to try and find ways to customize pry further to improve productivity or make it look awesome. If you’re interested in other ways you can customize pry, check out their guide on github.
]]><![CDATA[Change Your iTerm Prompt to Emoji]]>2014-11-23T16:52:58-07:00http://trayo.github.io/blog/2014/11/23/change-your-iterm-prompt-to-emojiHello and welcome to my tutorial on how to further
customize your iTerm. This tutorial follows
my previous tutorial
on how to customize the colors and background of iTerm to
make it more visually pleasing.
In this tutorial we are going to change our prompt to
have an emoji instead of a dollar sign ($), which can
be seen in the following screenshot.
When we left off in the last tutorial we ended up with
a terminal window similar to this:
Let’s do that change thing!
The first thing you’re going to want to do is open your
bash profile. I’m also assuming you have one made already
are, at least, mildly aware that it exists. Open up iTerm
and navigate to your root directory. If terminal hasn’t
opened in your root directory the easiest way to get
there is to type cd in and push enter.
From your root directory, open up your bash profile in
Text Edit, the built in Apple text editor. The simple way
to do this is to type:
open .bash_profile
in your terminal. You should get something like the
following:
In this file you’re going to look for \$. For me it was
at the bottom of the file. You can also find it doing a
search with ⌘+F.
Once you find it, highlight the leading escape \ and
the $. Then open up the Apple special characters
menu with ^ ⌘ Space or by finding it at the bottom of
the edit menu.
This will open up the built Apple menu with special
characters and emoji. Here you can select any emoji
you’d like, but, obviously, pizza is the best emoji
and it’ll be the one I’ll be selecting.
Your bash profile should now have your emoji in it!
I highly recommend adding a space or two after the
emoji, otherwise you may end typing inside the emoji.
Also, the reason I recommend using Apple’s TextEdit
is because if you ended up using Atom or another
text editor, you’re emoji might end up look like the
following:
Final Product
Open a new tab or iTerm window and it should look as
awesome as this:
]]><![CDATA[How to Customize iTerm]]>2014-10-22T19:12:24-07:00http://trayo.github.io/blog/2014/10/22/how-to-customize-itermHello!
Welcome to my tutorial on customizing iTerm!
In this tutorial I’m going to show you the basics of importing color schemes,
customizing those schemes and setting up a background. The shot below is our
destination final product.
Let’s get started!
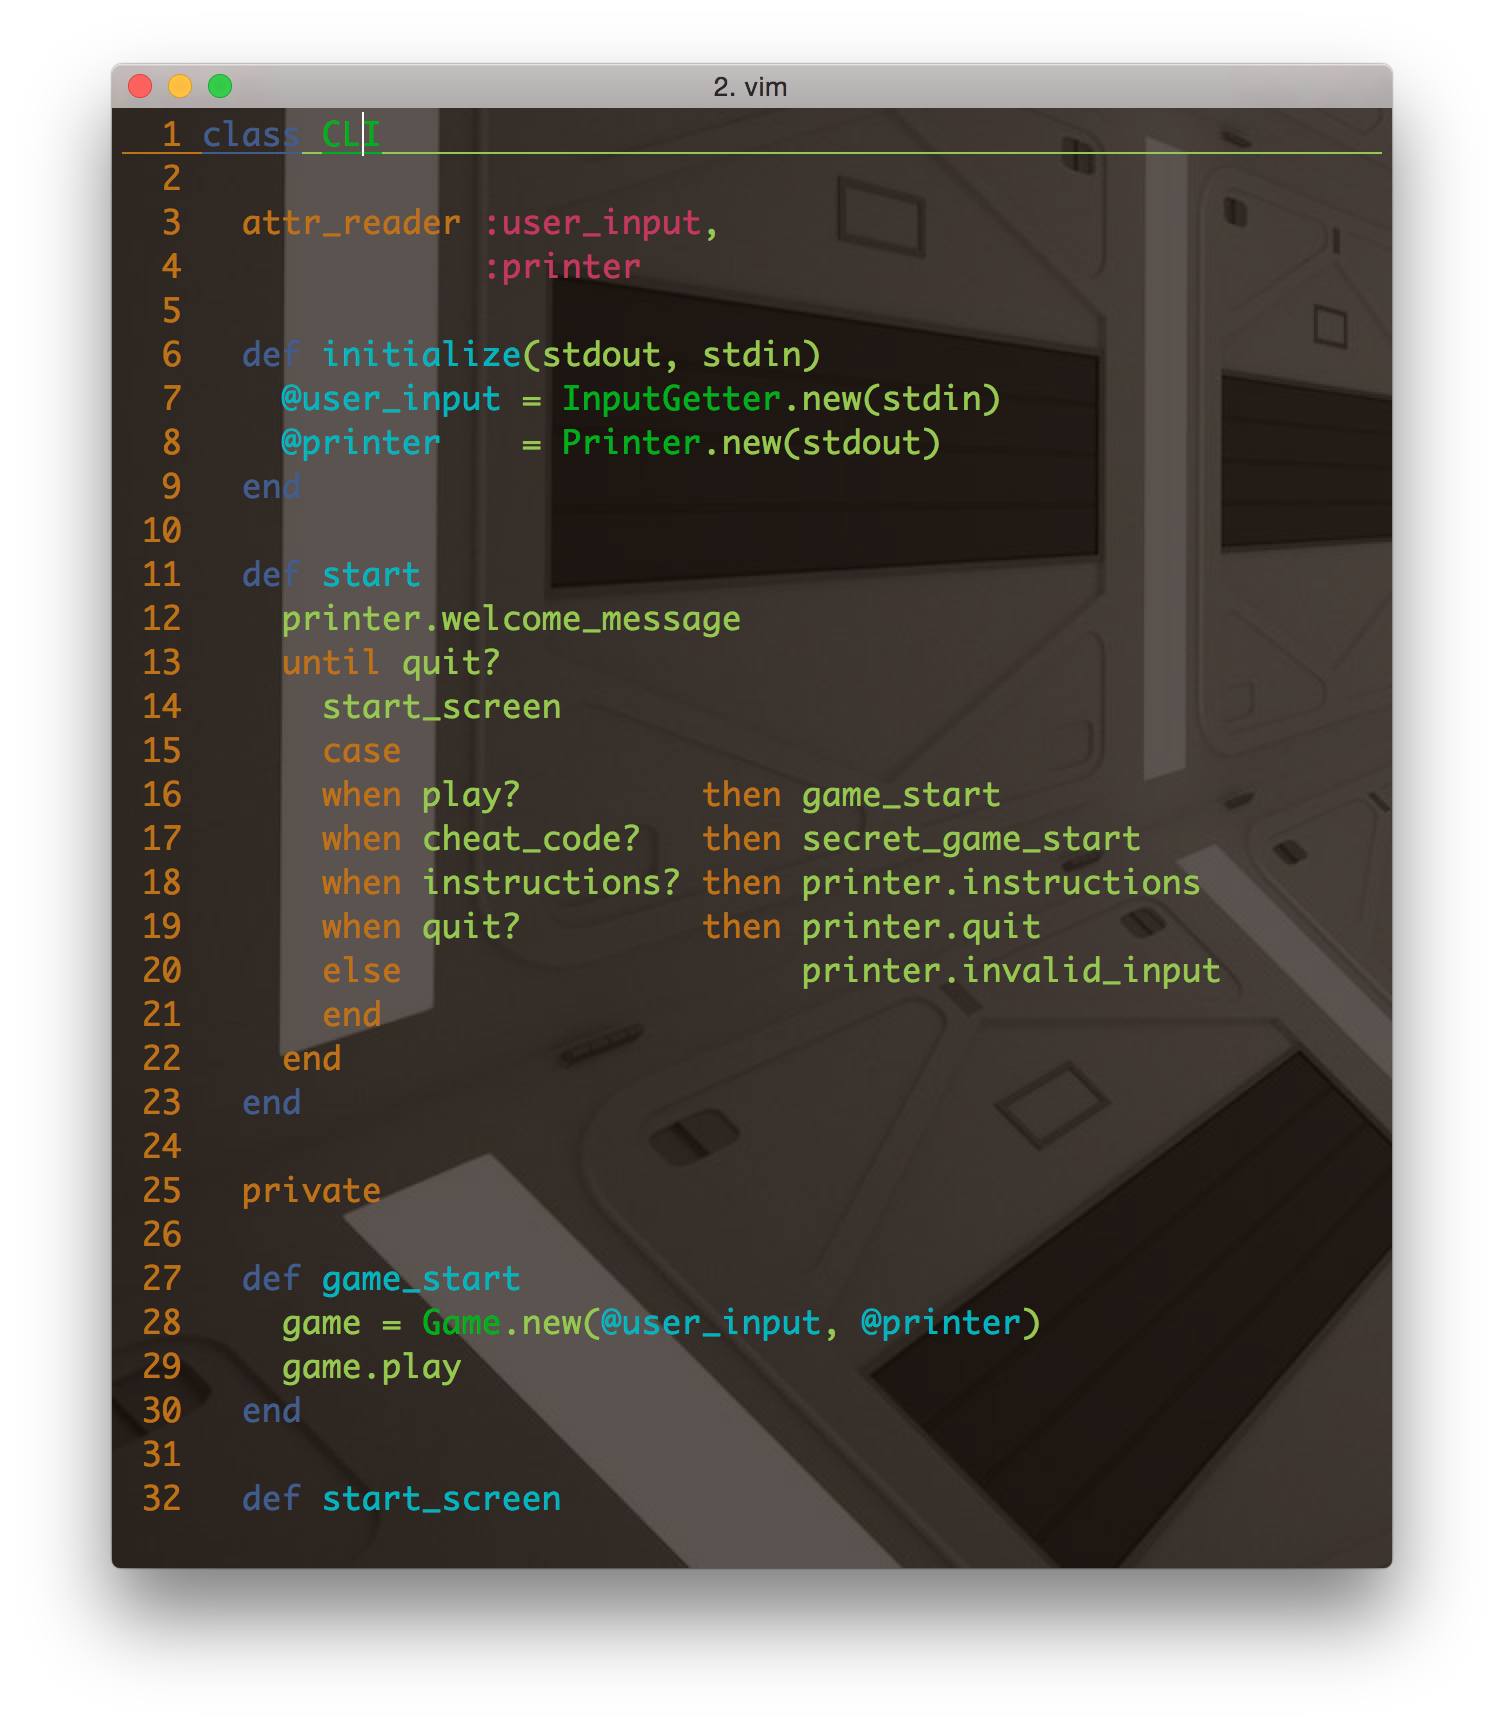
Here’s what my terminal looked like when I started, with a shot of vim for good measure:
A quick google search will show some
results for awesome color schemes already made by the community.
We’re going to use the schemes available at iterm2colorschemes.com
since they have a bunch of ready made schemes available.
When you find one you like we’re going to clone
the repository off of Github. The files
aren’t very large and you’ll have them readily available for quickly switching between colors.
Open up that terminal and navigate to a directory where you would like to clone the repo.
I used my Documents folder.
12
$ cd Documents/
$ git clone https://github.com/mbadolato/iTerm2-Color-Schemes
The creators of the repository were kind enough to include an awesome terminal command
that will let you cycle through all the colors and find one that you like. Simply
enter this command in your terminal:
tools/preview.rb schemes/*
And it will cycle through the schemes when you push a button on your keyboard. You can
exit the cycle by hitting ctrl + C when you find one that you want to import.
Still in terminal, open up preferences. This can be done either one of two ways:
from the menu bar under iTerm > Preferences
or use the keyboard shortcut ( ⌘ + , ) .
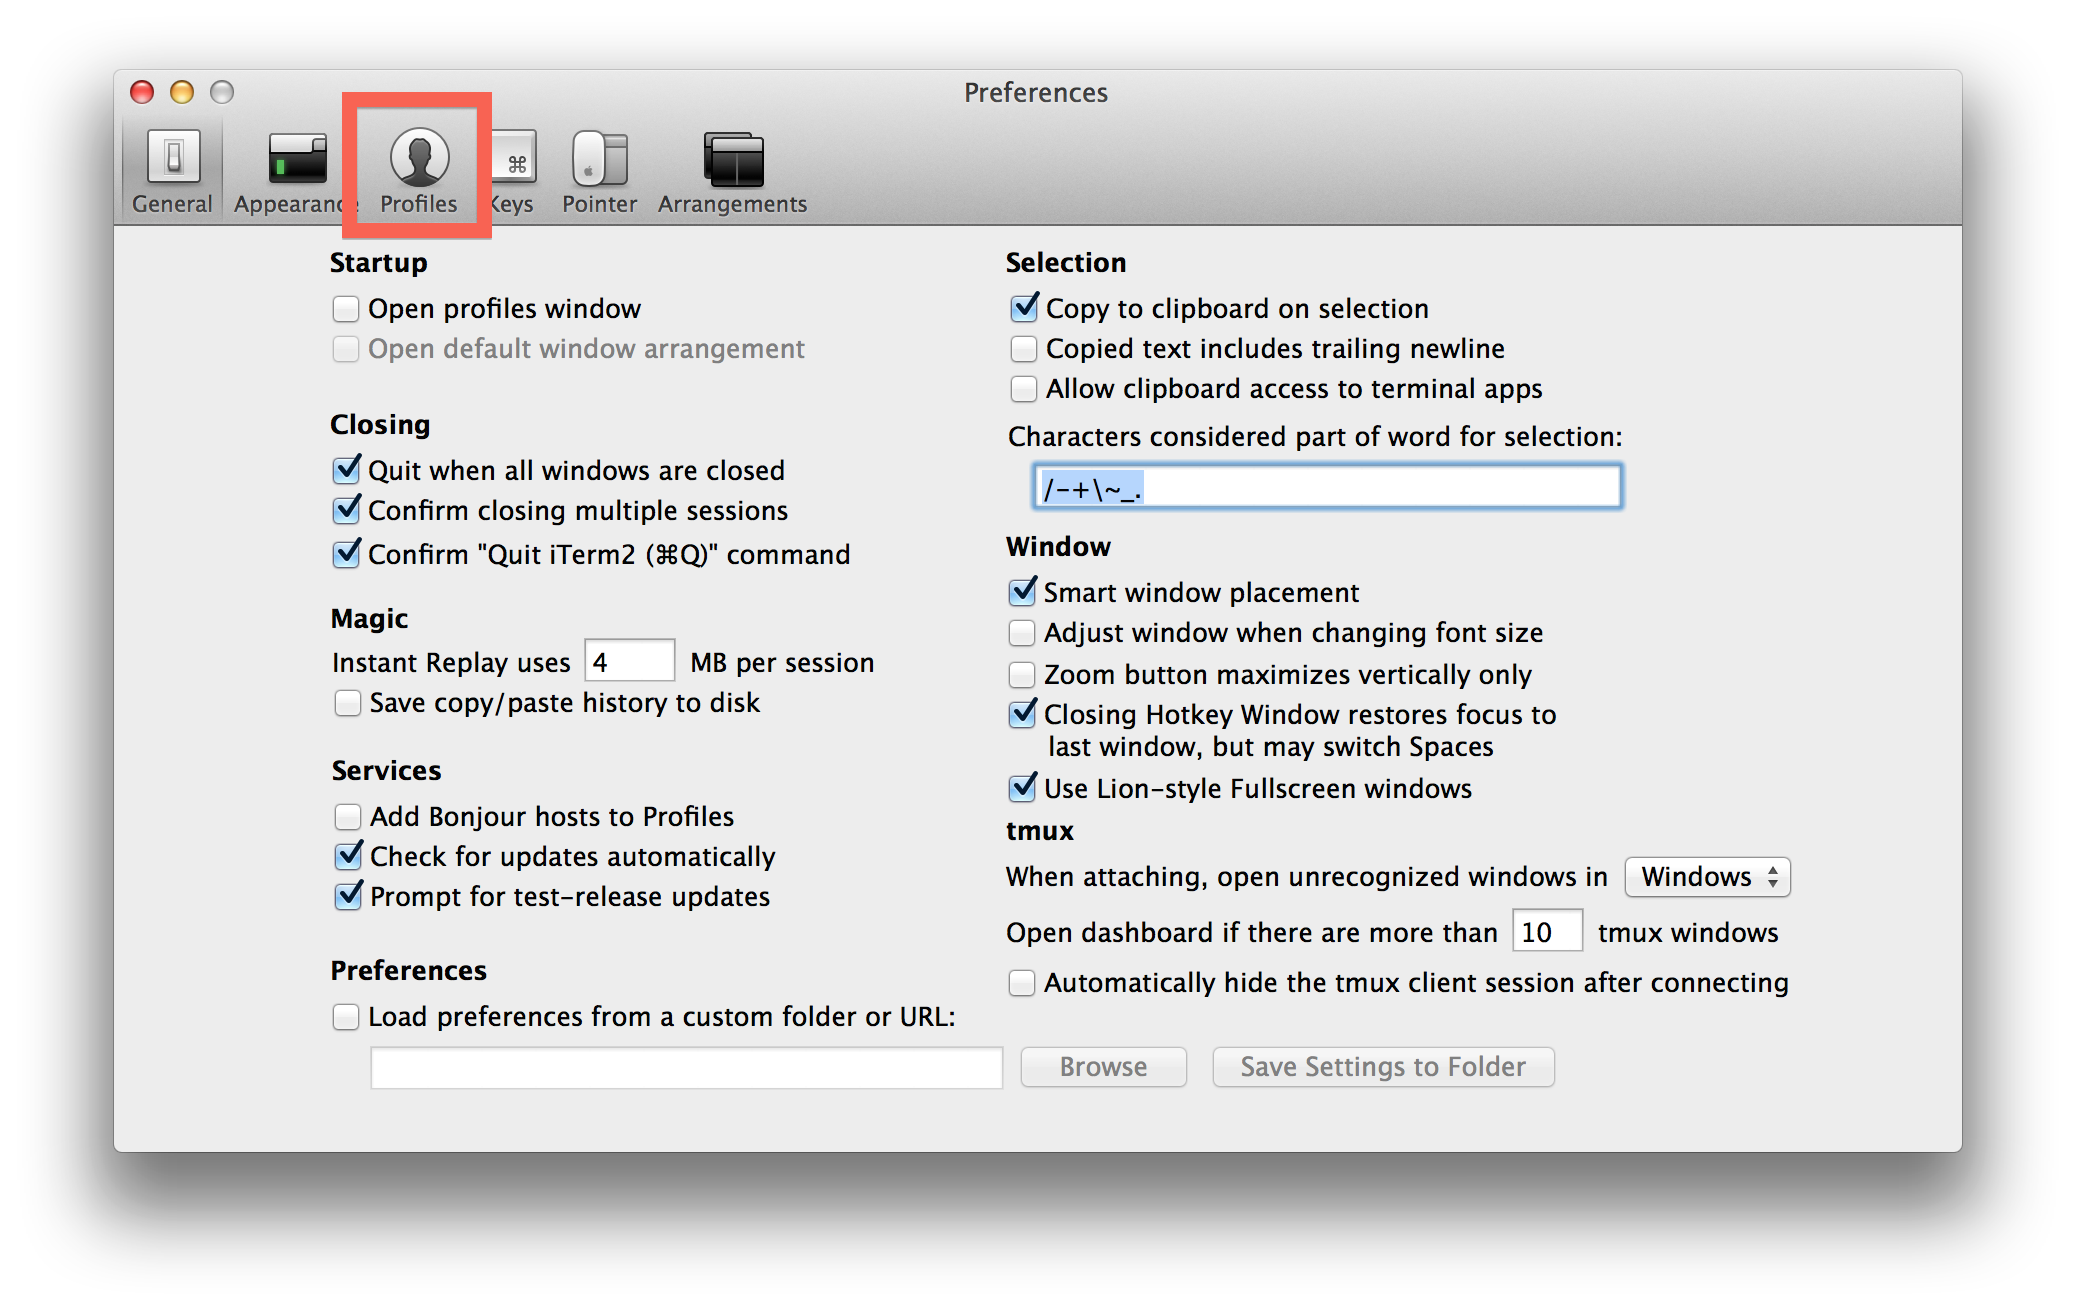
Once you’re in the preferences window, click on the profiles button.
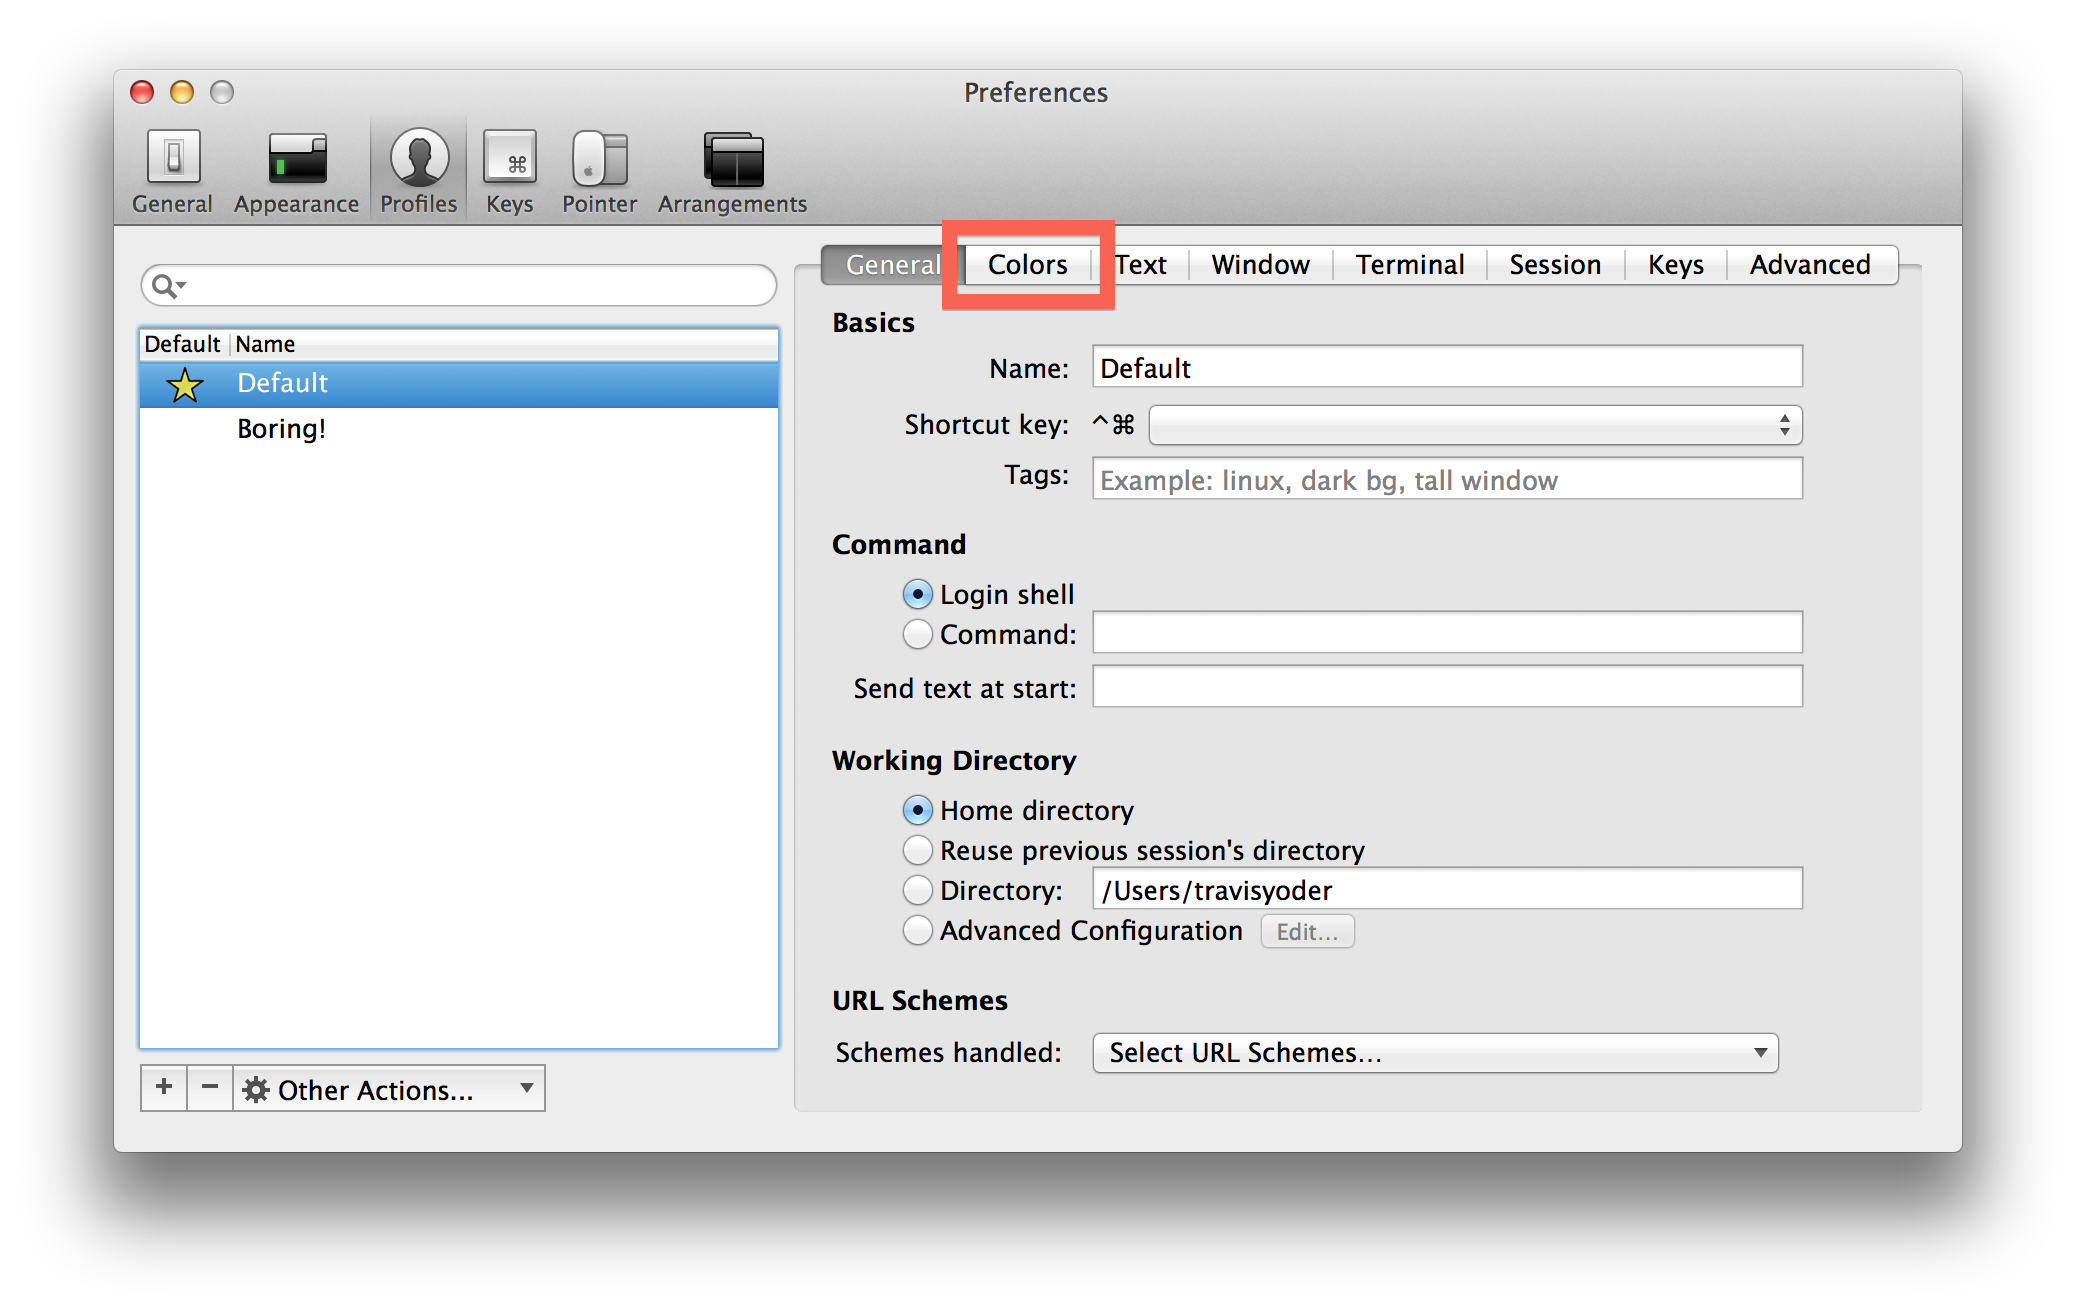
Then click on the colors tab.
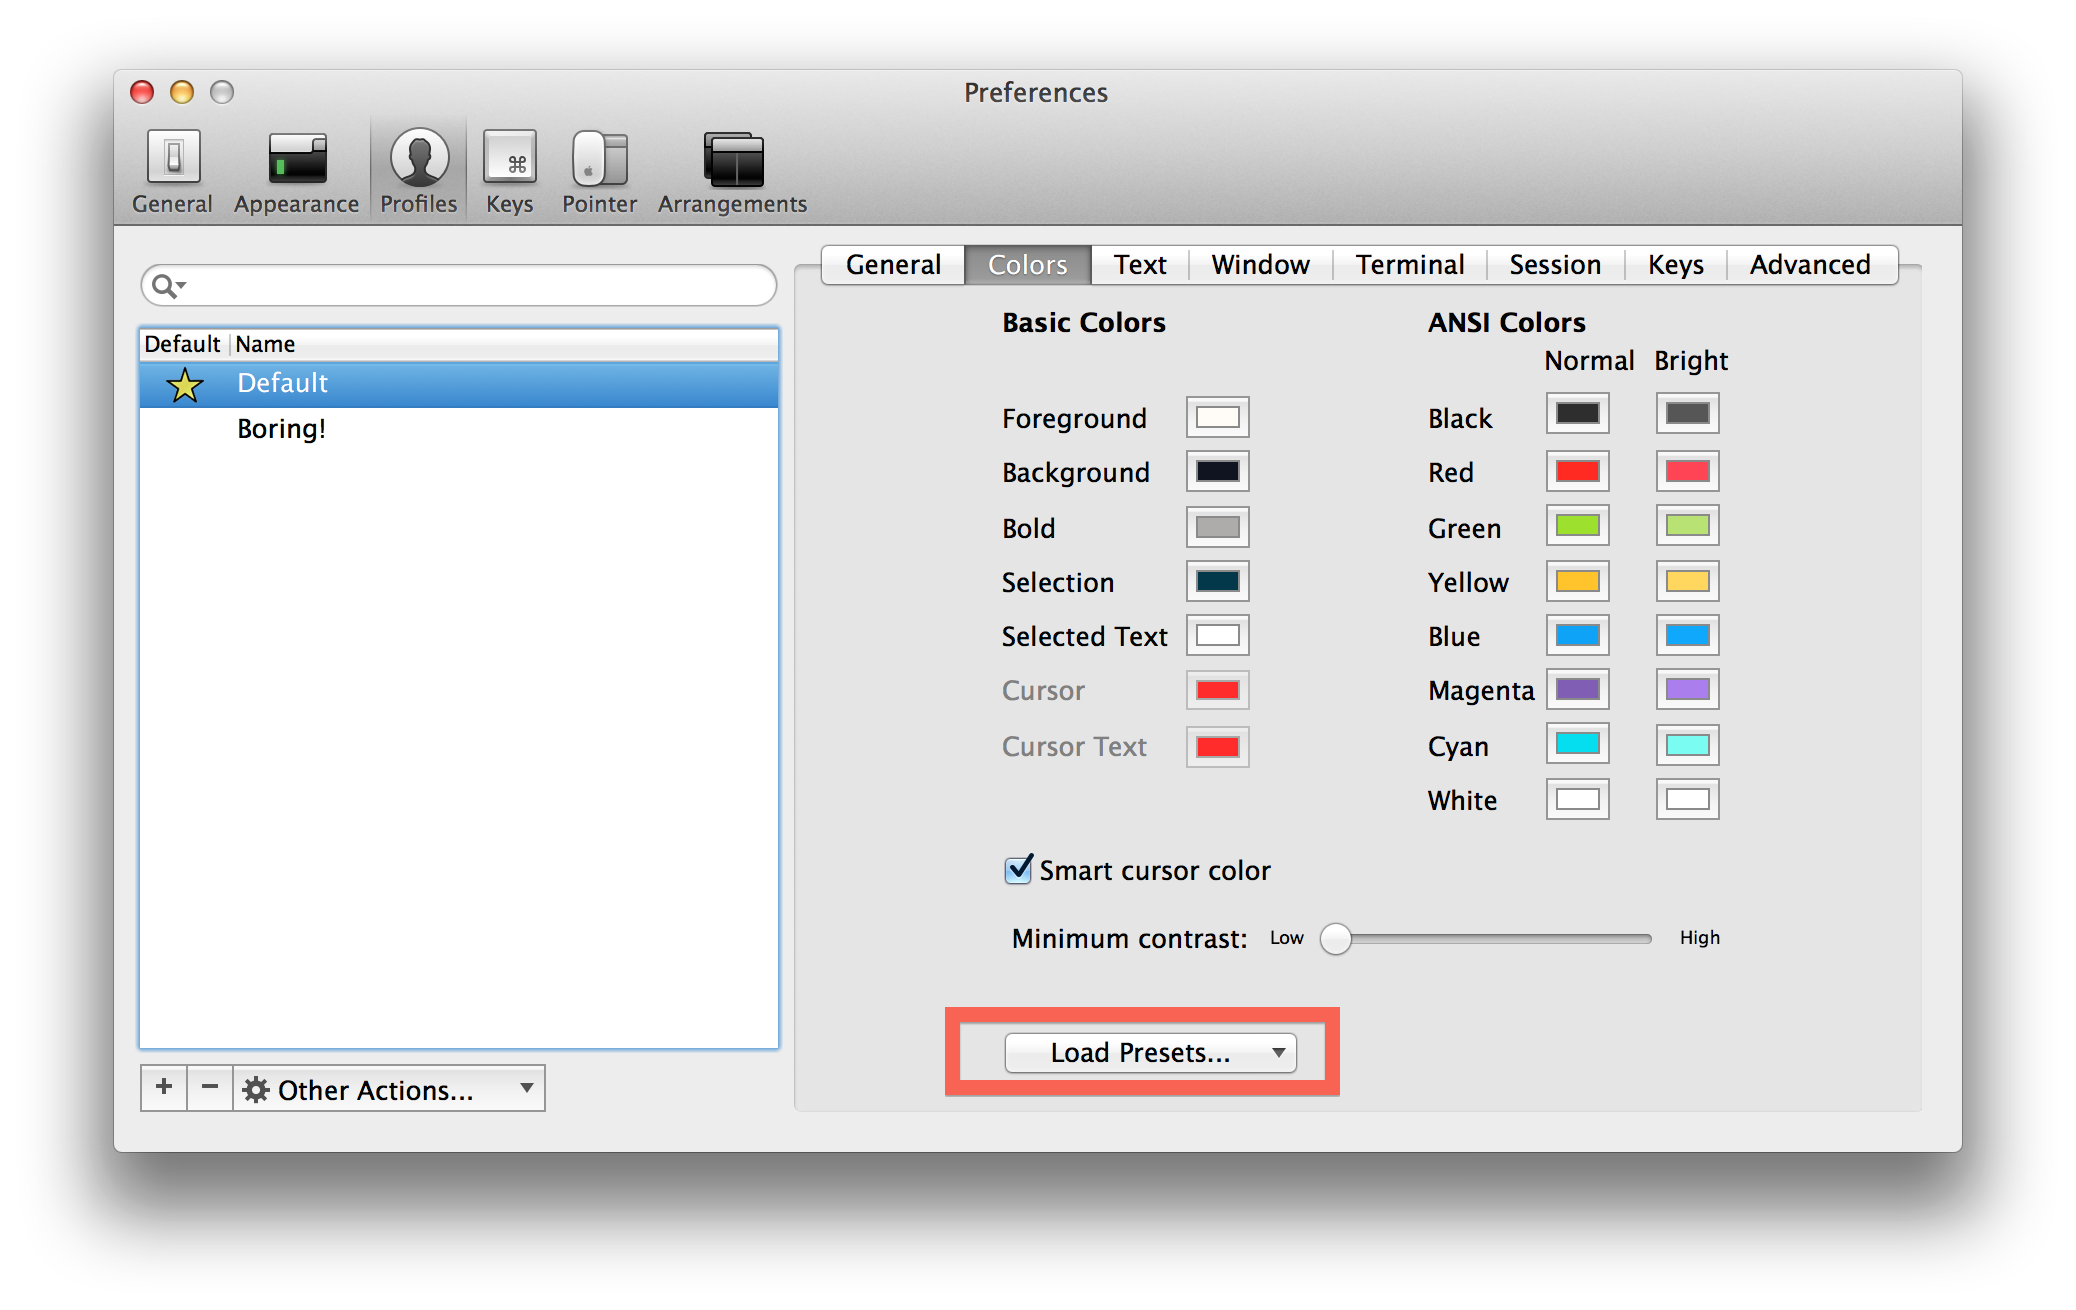
Importing colors!
At the bottom there is a load presets button that will let us import the color themes
that we cloned.
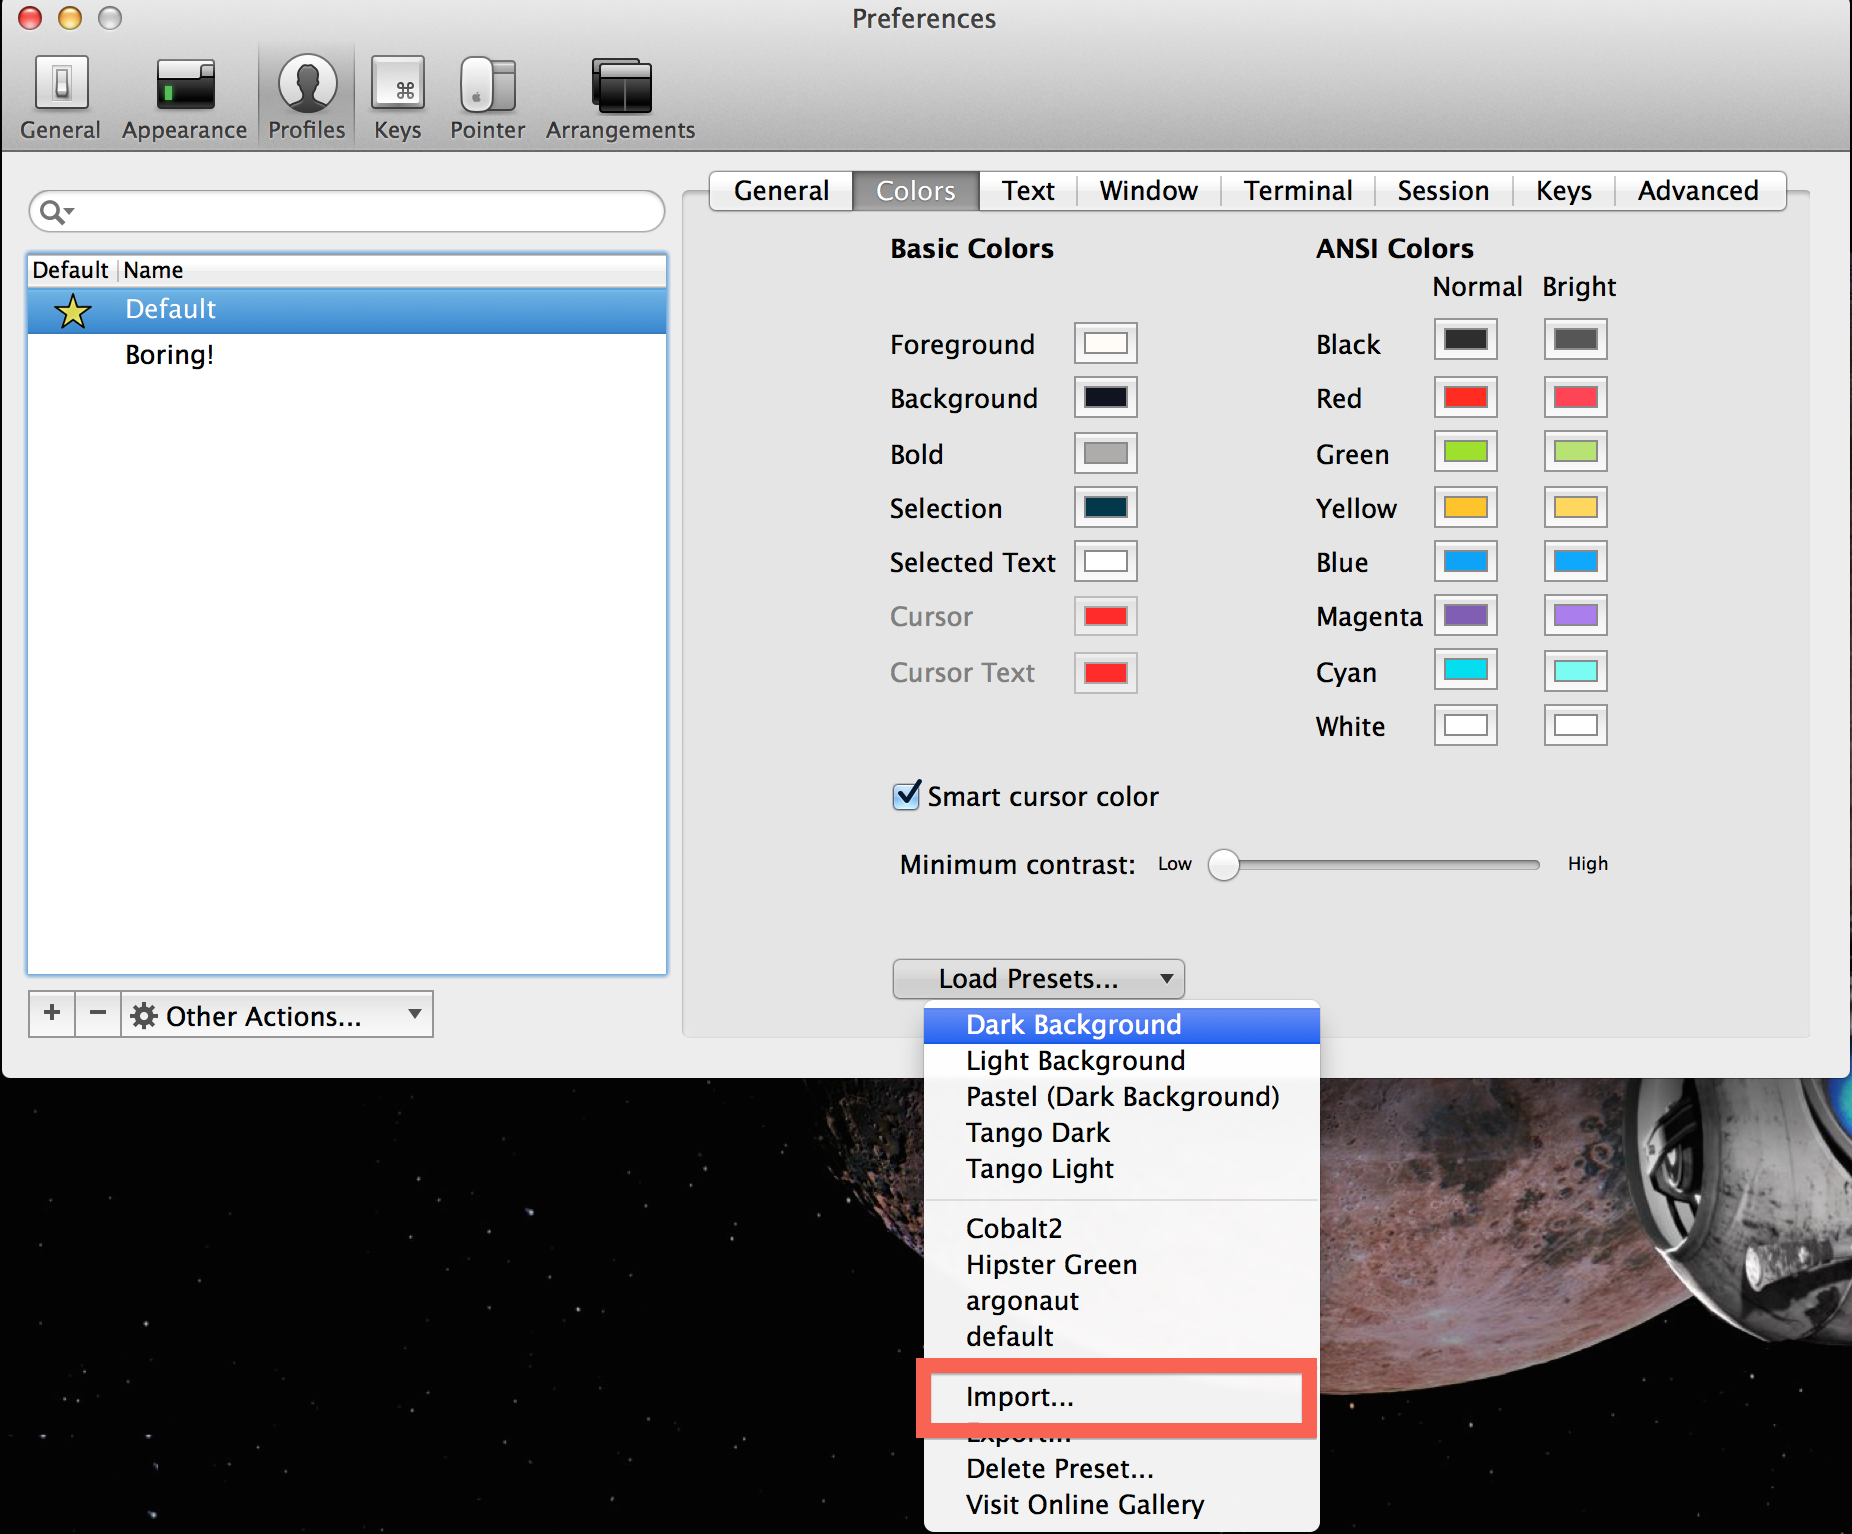
In the little drop down window click import.
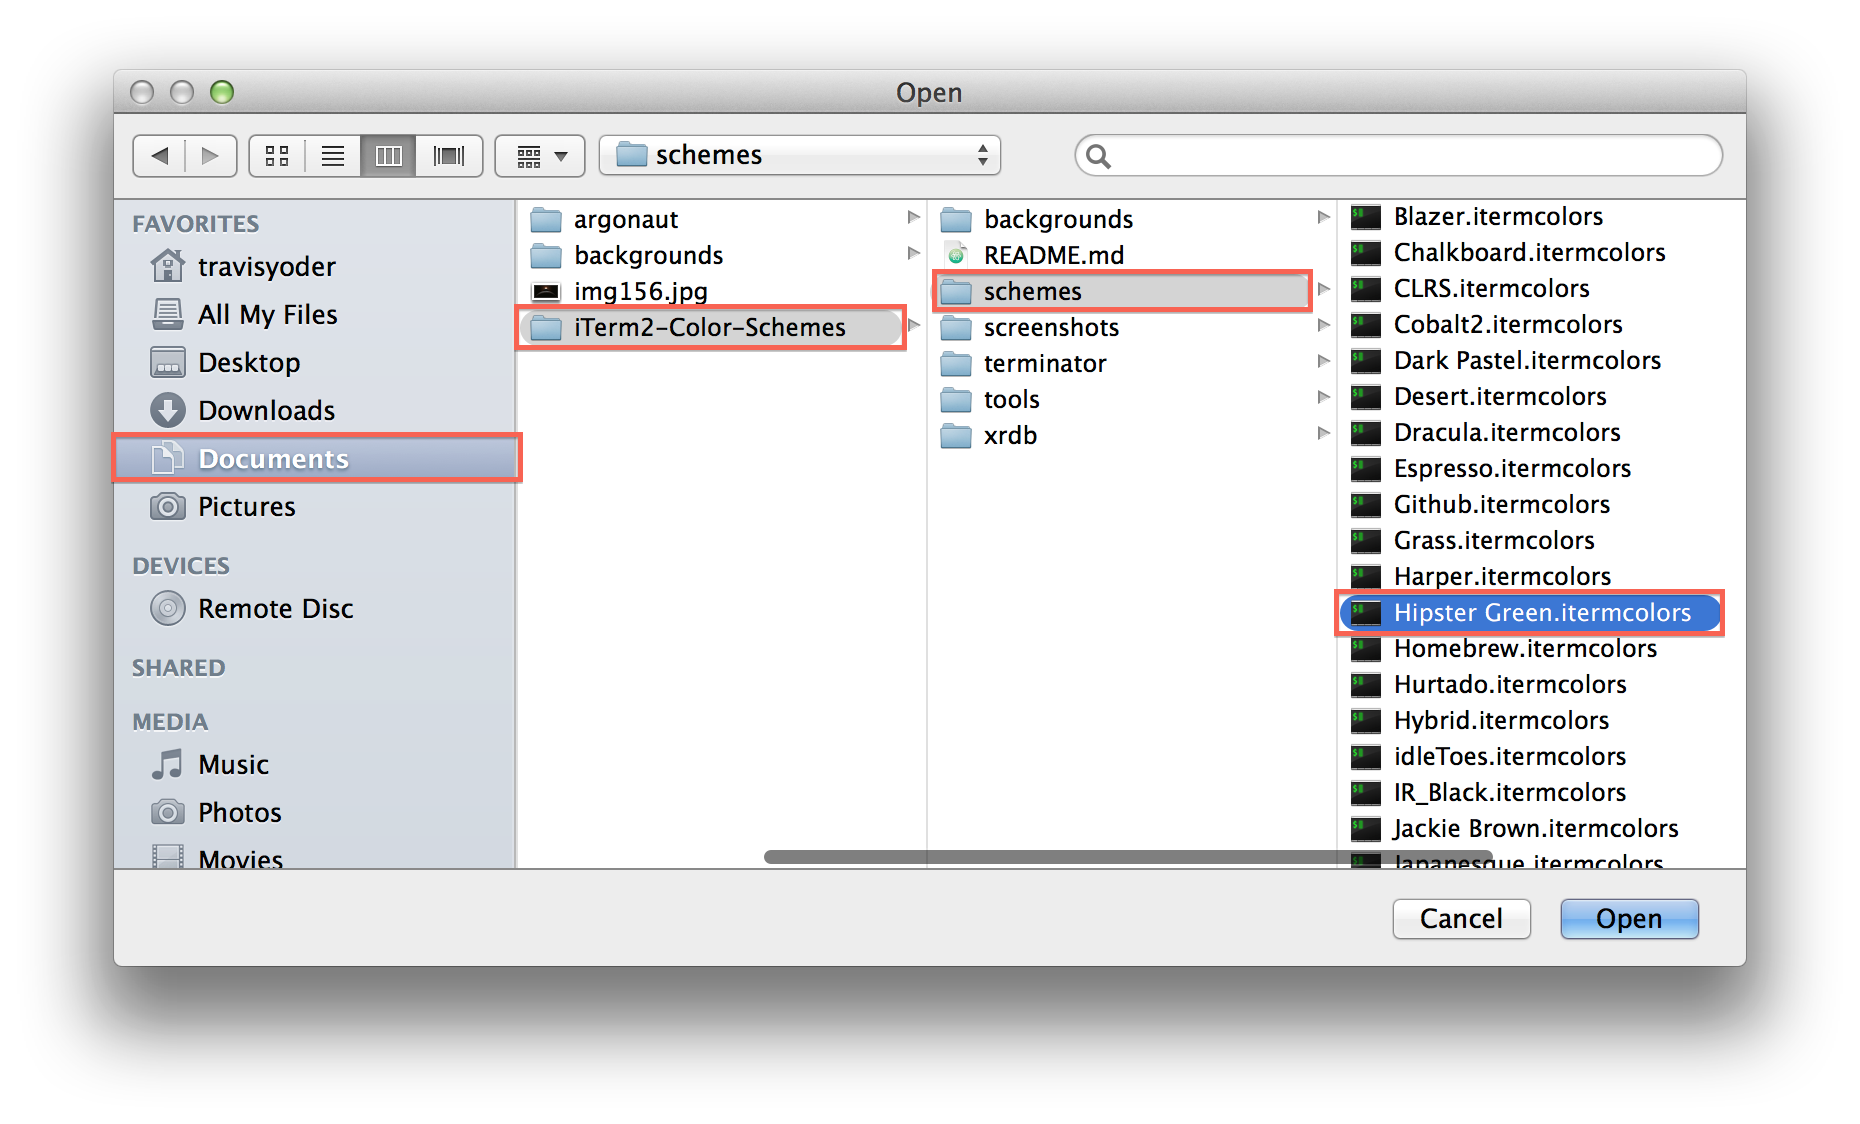
Choose the theme that you would like to import. You can import as
many as you like, but you don’t need to import all of them. You can
find a theme put the command in terminal I put earlier:
tools/preview.rb schemes/*
that will cycle you through the colors.
The theme you choose will then appear in the load presets drop down where you can select it.
It should reflect immediately because we are working on the default profile.
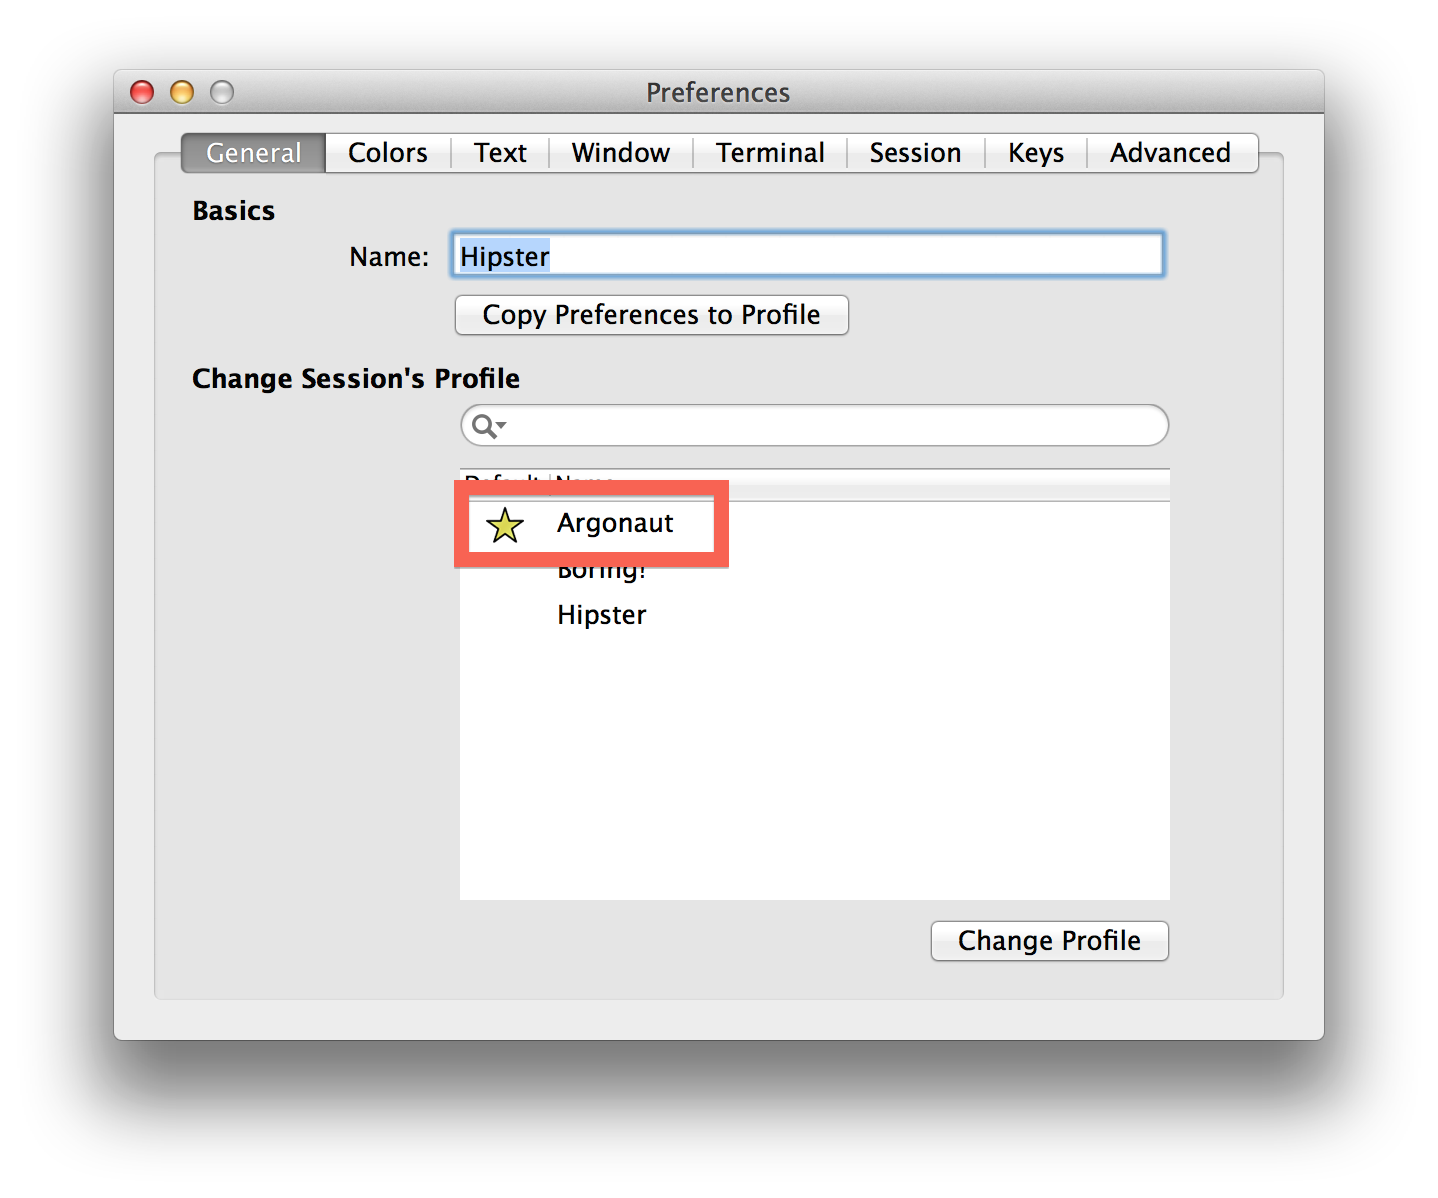
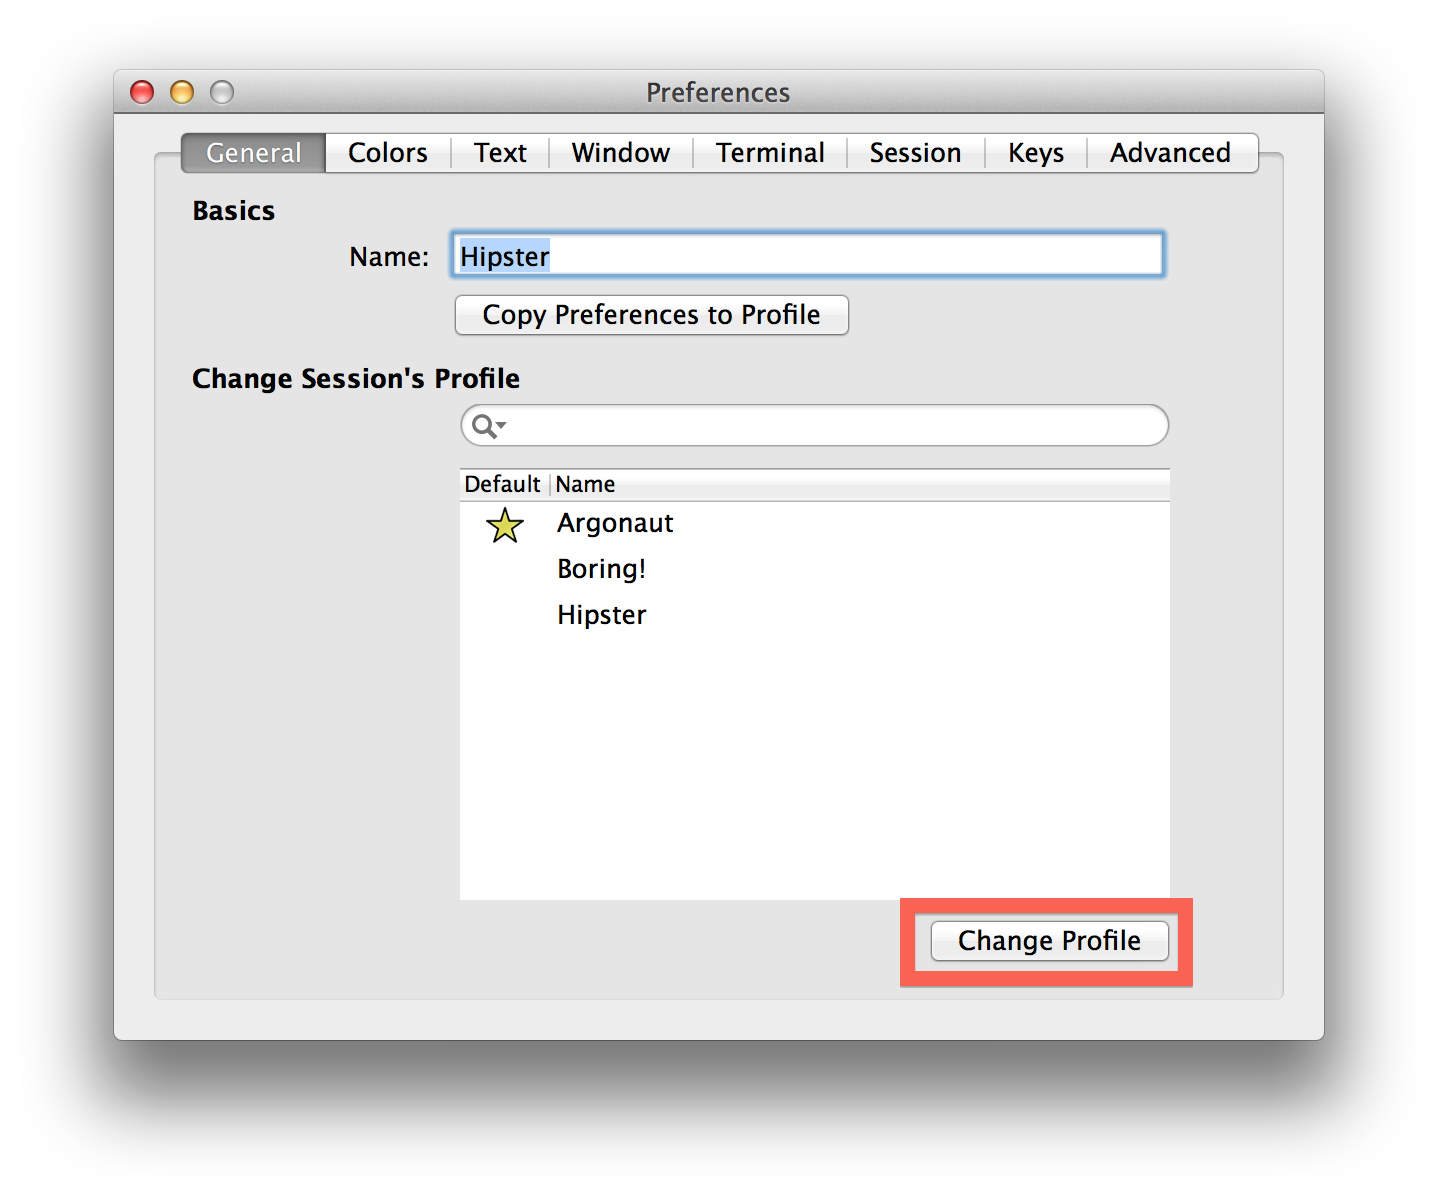
If it didn’t work right away:
If for some reason it didn’t update immediately, exit preferences and open up the profile
chooser by hitting ( ⌘ + i ). You will get the following window.
Select the profile that you are working with. If you didn’t create a profile, then your
profile will be the one available called default. Then choose change profile.
Now we should see our colors change! Woo!
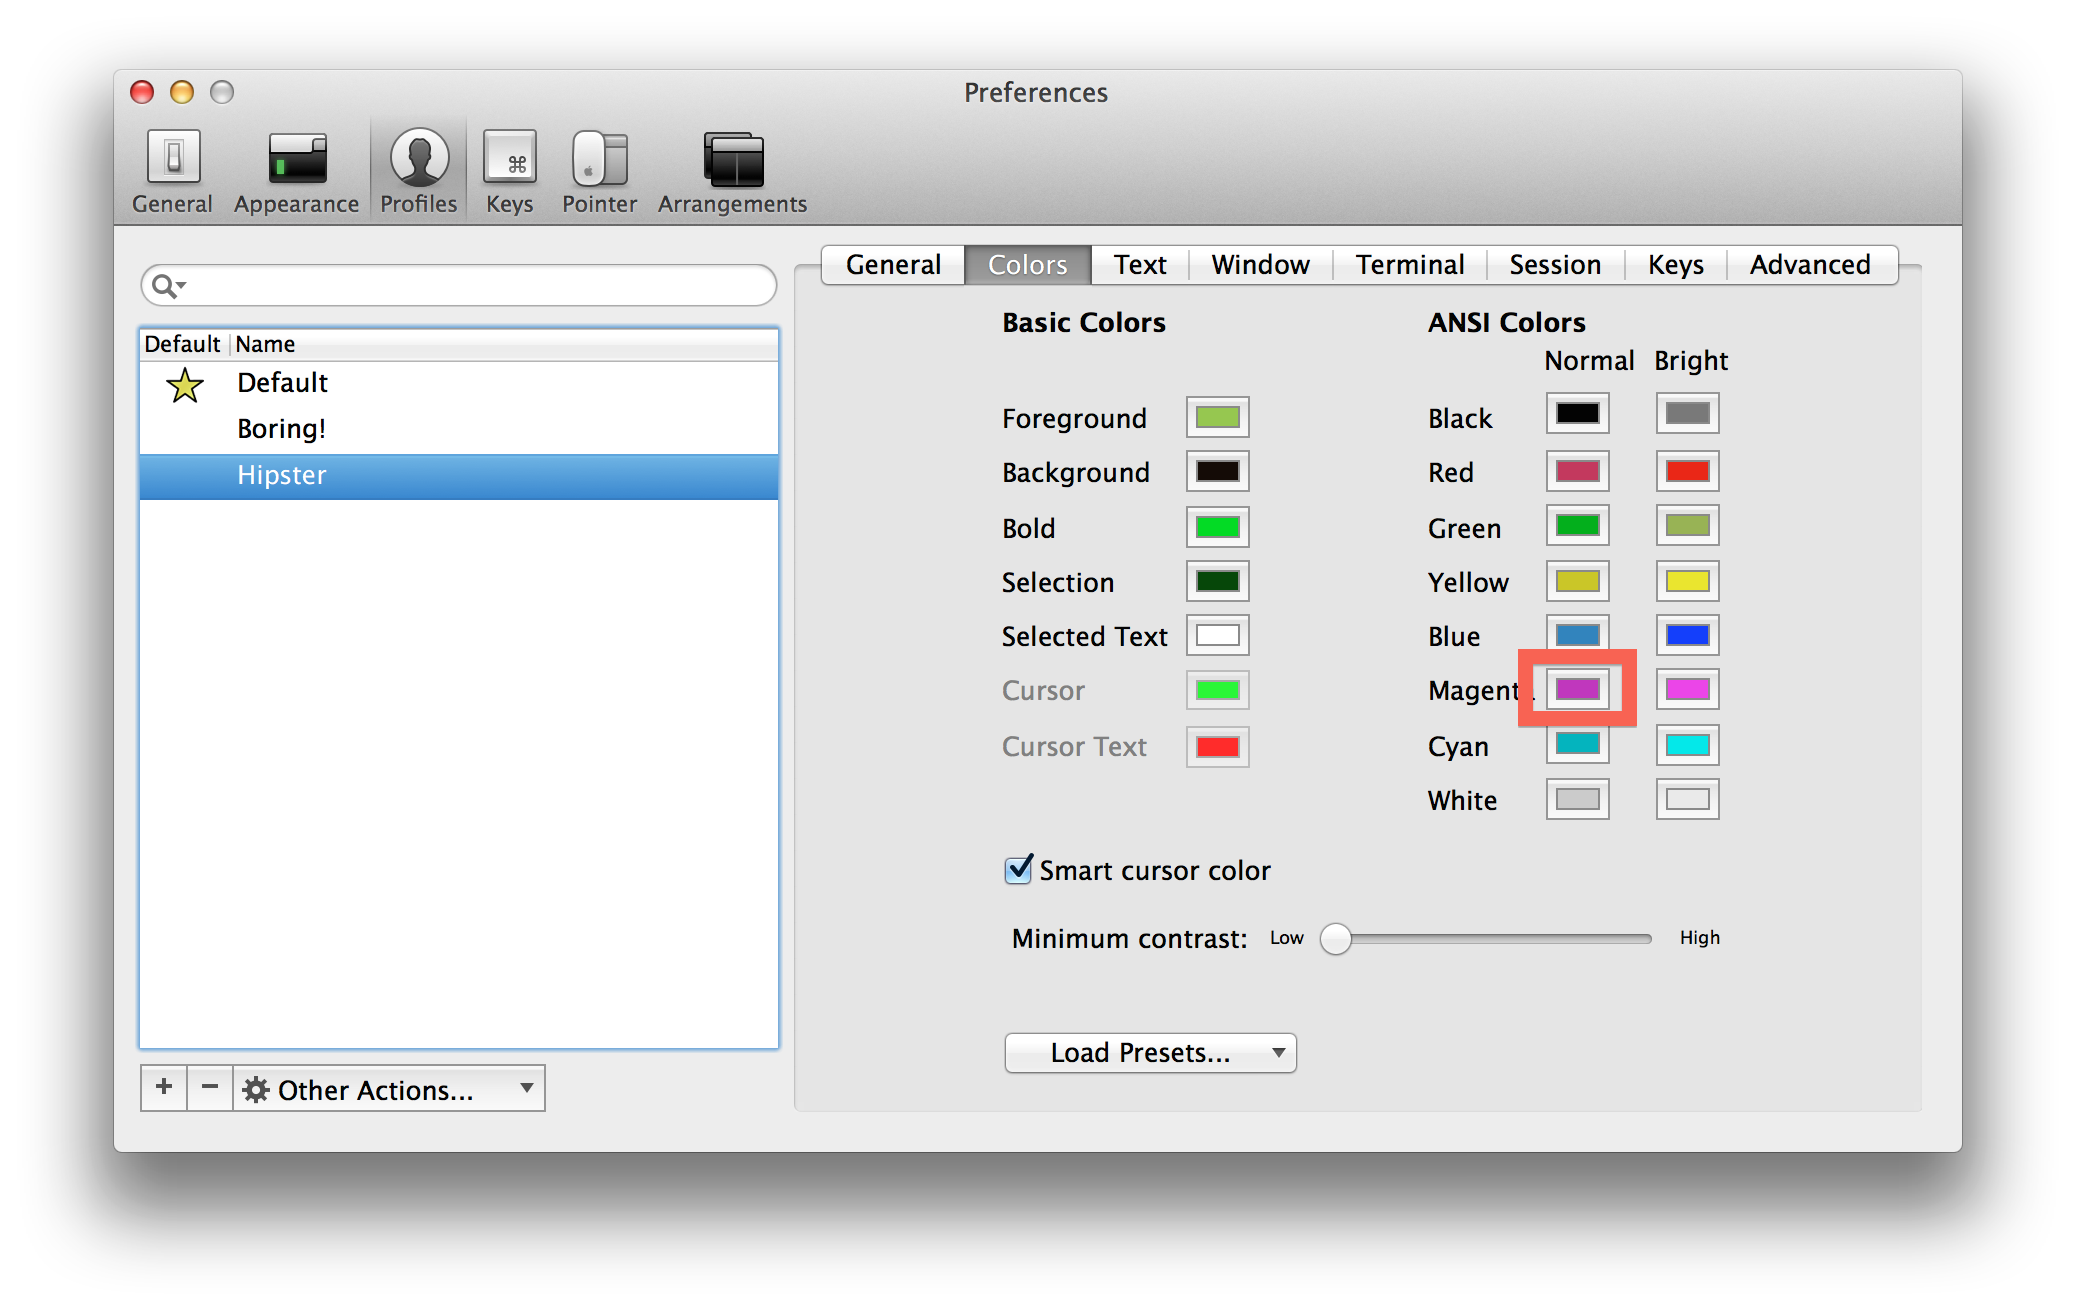
Customize a little more!
In the colors tab in preferences there are some color boxes that change the overall
colors. The background box here is used you want to change your background color, but at the end of the tutorial I
will show you how to select a wallpaper instead of having a plain solid color for a background.
The bar for me that is pink with the time on it didn’t change and doesn’t quite match the rest
of the colors in the scheme so it becomes a prime candidate for customizing.
The colors back on preferences correspond directly to what is seen on screen and this is what
the scheme is changing.
Of the two magenta boxes, the one I want is on the left.
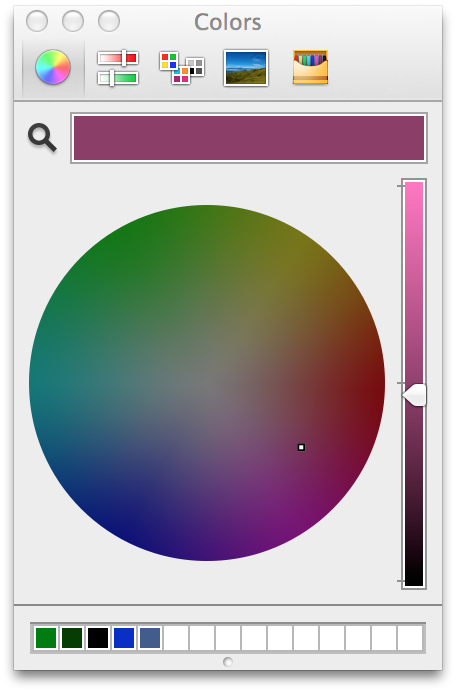
The following window shows up when it’s clicked. The tabs at the top of this window have some
different ways to pick colors. I used the color wheel, but the color palette tab in the middle
is an awesome source too.
If you use the color wheel, I recommend keeping the arrow on the bar to the right of the color
wheel slightly under the middle line, but it will vary based on your preferences and scheme.
Now we have a new color for the bar.
If it didn’t work right away:
Again, if for some reason it didn’t update immediately, exit preferences and open up the profile
chooser by hitting ( ⌘ + i ). You will get the following window.
Select the profile that you are working with. If you didn’t create a profile, then your
profile will be the one available called default. Then choose change profile.
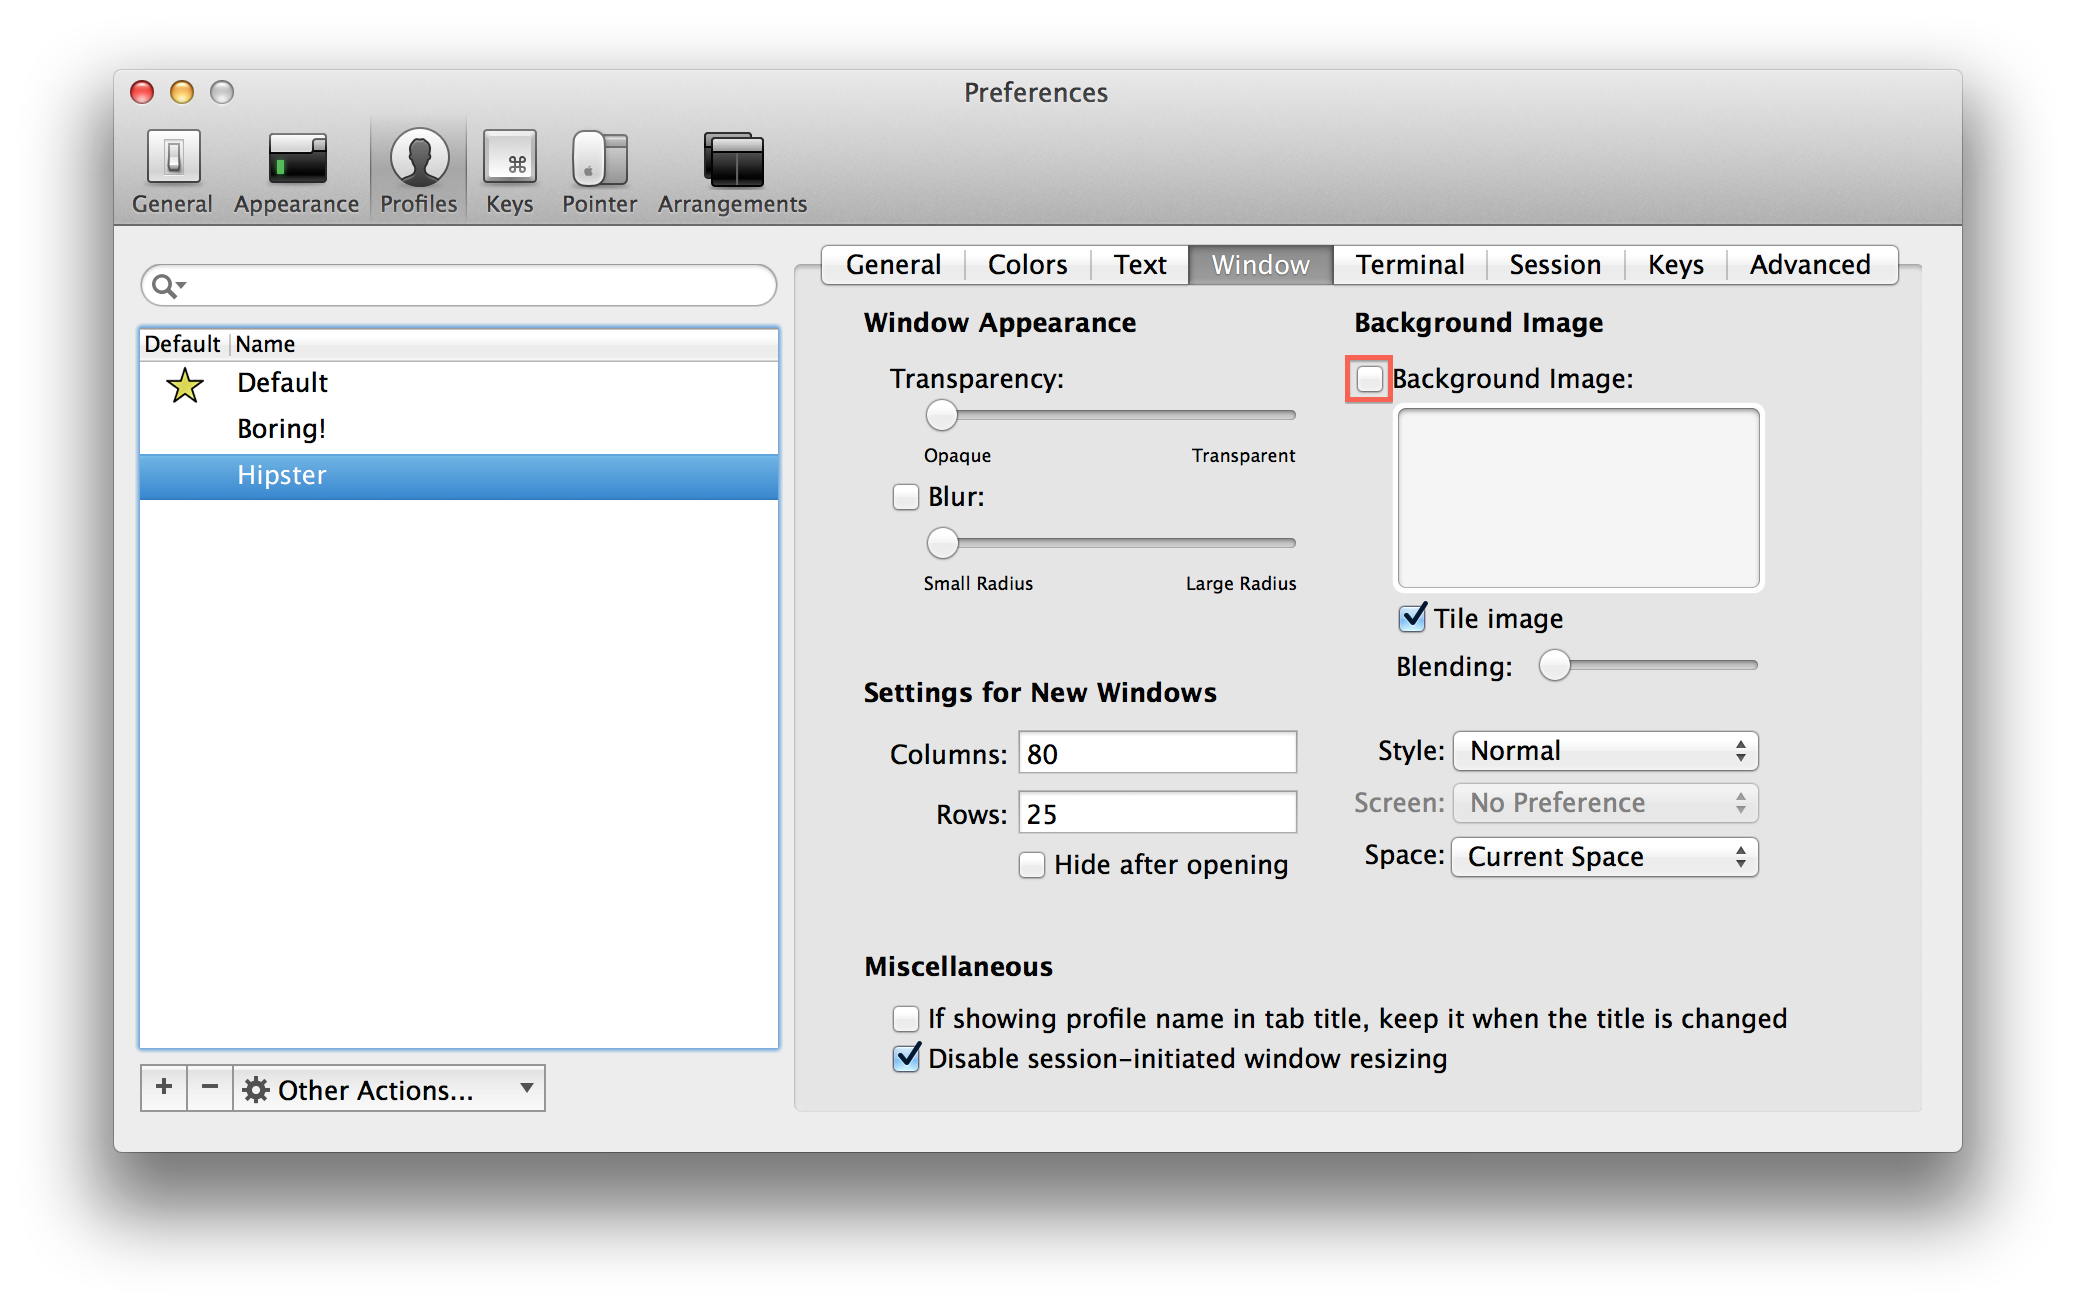
Customize the background image!
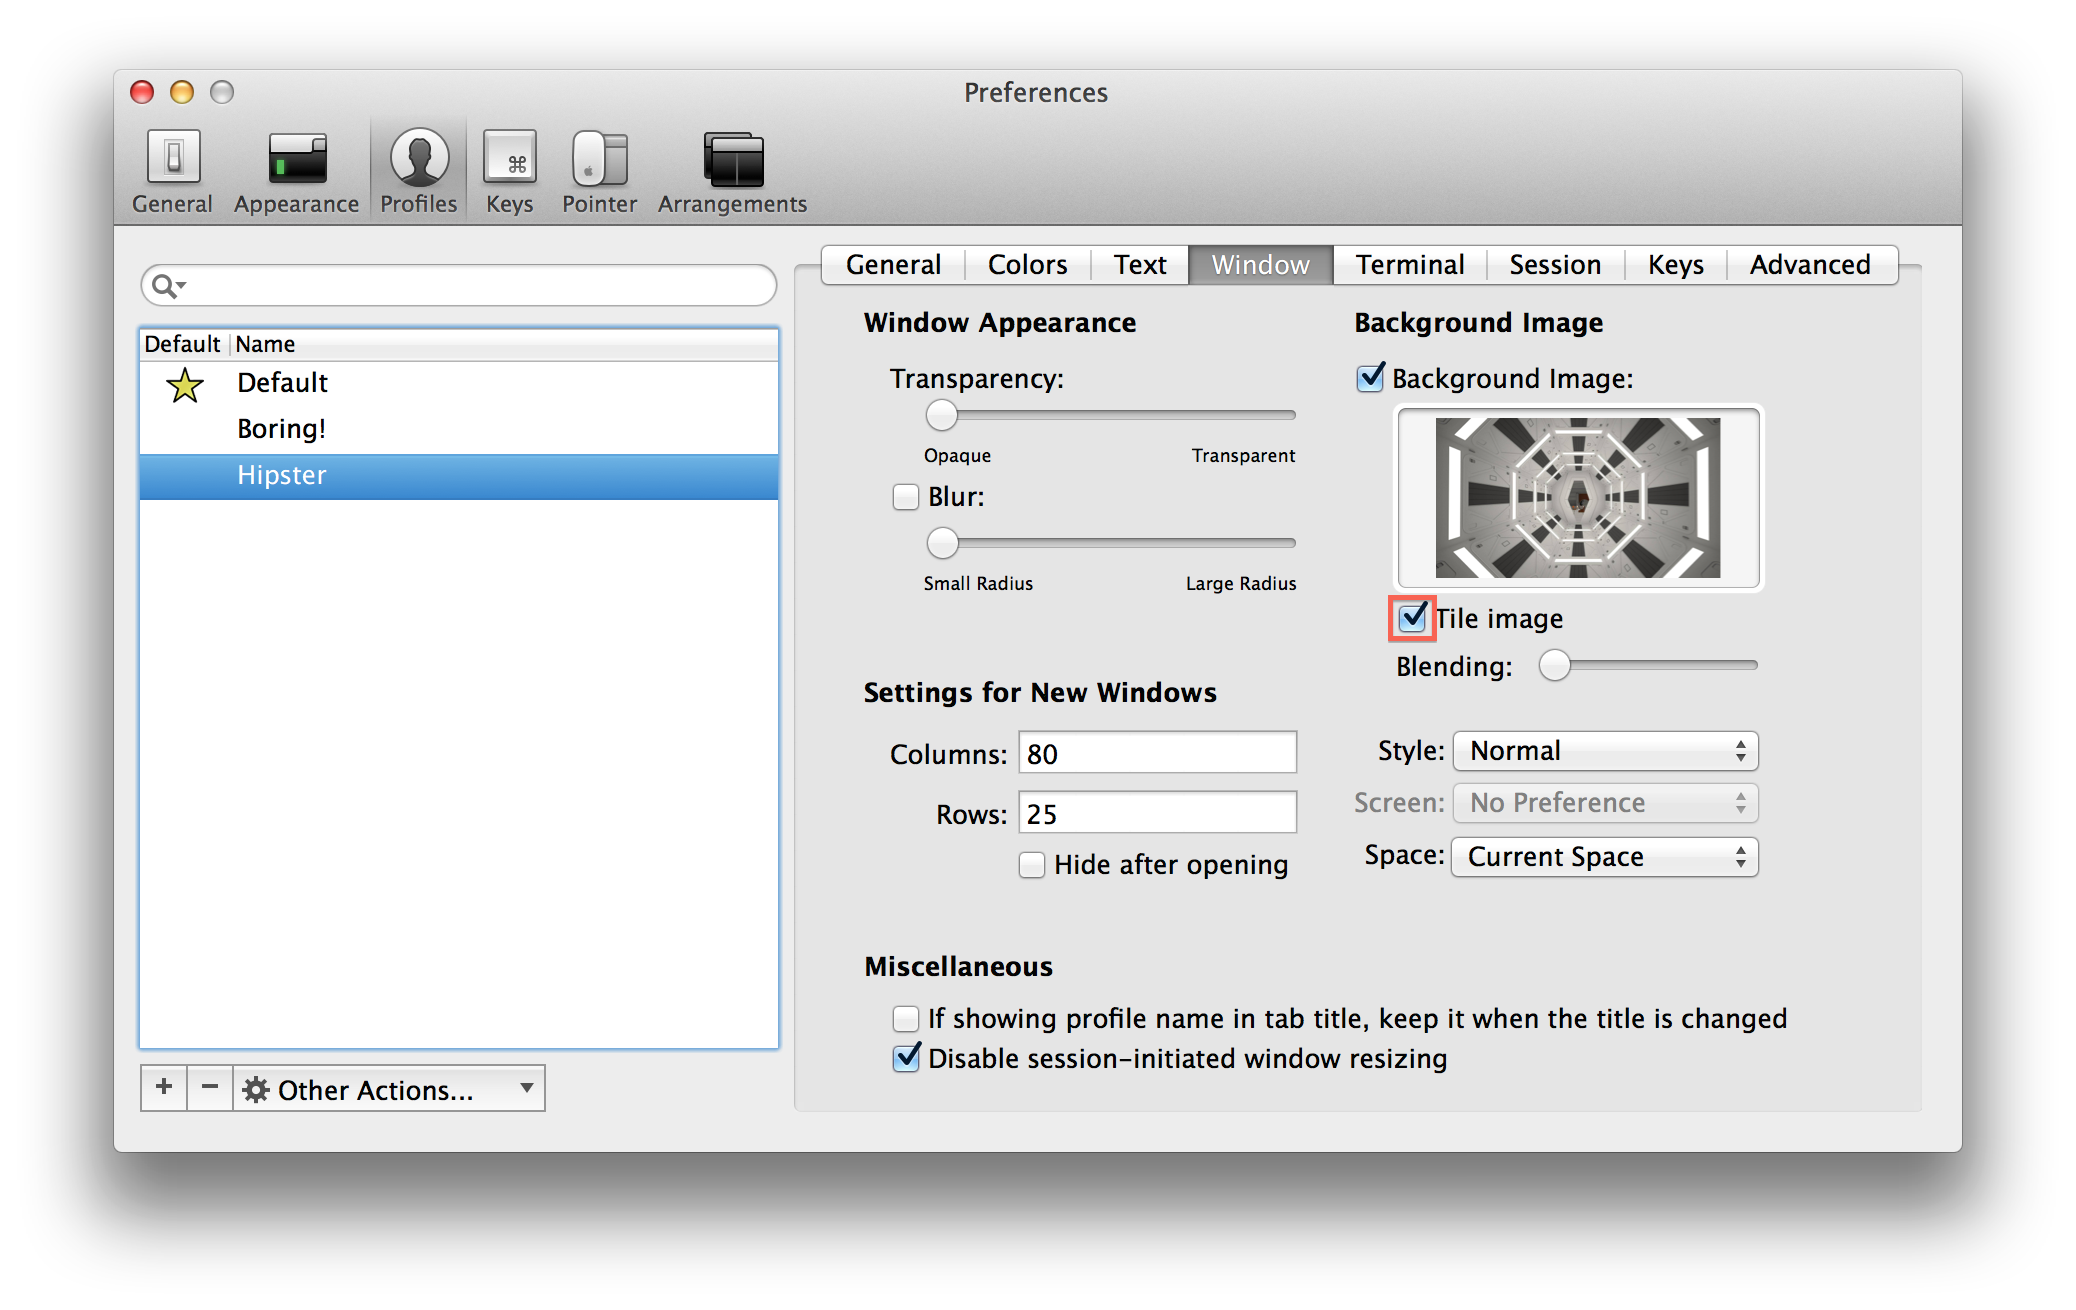
Back in the Preferences and under Profiles, open the Window tab.
Click on the little check box for Background Image to open the window where you can select your background.
Depending on your background’s resolution, I recommend turing on Tile Image.
If your background is the same resolution of you monitor or larger, this will prevent the background image from scaling when the window size changes.
Final product!
This is again the final product. It’s more pleasing that just a plain black background and some white text.
You can also see the way tiling the image works when the window is half size and full size.